Since the announcement of CoreML at WWDC this year I have been very excited to get in and start researching all the capabilities of Apple's new machine learning framework. One of the ideas I had to test the capabilities of CoreML was to build a recommendation engine to provide users of an application with musical recommendations based upon a library of known selections. CoreML would be used in this recommendation engine to fit musical selections to a machine learning model called a linear regression model. This model would then feed predictions back to the application on what the user could possibly want to listen to next based upon a current or previous selection by the user.
Creating a linear regression model is not something that CoreML can build for you from scratch. In fact, almost all the work to build the model and get it to a place where CoreML can consume it is done outside the context of CoreML. And thus is the topic for this article. To evaluate my research in building a data model with scikit-learn so the model can be consumed by CoreML to make accurate recommendations. Sound exciting? Let's jump in!
NOTE: This article assumes you are running macOS High Sierra as your workstation operating system. CoreML at the time this article was written, only works on macOS High Sierra 10.13. This article also assumes that you have at least these development dependencies installed: Python 2.7, Jupyter Notebooks, scikit-learn, coremltools, NumPy, Pandas, and matplotlib.
Building the Data

The data for this article was obtained from a repository called the Million Song Dataset. This repository freely distributes data for over a million artists and songs in either a database (.db) or text (.txt) format. For this article, I freely obtained samples of artists and genre data to compile the necessary information to generate my model. For more information on the Million Song Dataset, visit their website here: https://labrosa.ee.columbia.edu/millionsong/
At the beginning of a data modeling project there is quite the evolution that occurs from the point at which you get the data to the point at which the data can be consumed and computed by a machine learning algorithm. My evolution in building the recommendation engine was no different. The first approach I took was to evaluate what my data looked like when I obtained it, and then plan for what the data would look like in its readable state and then its computational state. I decided that since JSON is a very universal format of consumption, JSON would be the data format that I would use for both the readable and computational state. More on what readable and computational state means in a bit. Next, I had to decide on a property list for my JSON, and since this is a musical data model, I thought it would be useful to include a property for artist, genre, city, latitude, and longitude. That way my model would have knowledge on where the artist is located and what type of music they produce. This data transformation would take me from a data format that looked like:
Value<SEP>Value<SEP>VALUE<SEP>Value
To a readable state with JSON data formatted like this:
[ { “city”: “value”, “artist”: “value”, “genre1”: “value”, “latitude”: “value”, “longitude”: “value”}]
Once the data in a readable state, I then can take the next step in the evolution process, and that is to devise a plan to break up the data into a computational state. Breaking up the data into a computational state allows the data to be consumed by a machine algorithm, and that is the major difference between readable and computational states. A machine learning algorithm does not know how to efficiently compute or plot strings. However, if the strings are replaced with numerical placeholders, then an algorithm that processes data using Cartesian coordinates knows how to work with the data efficiently. You may hear this process referred to as data mapping in data science.
NOTE: I did not cover the steps taken in my evolution process to manually manipulate the data received from the Million Song Dataset to the final readable state displayed above. This process took quite a bit of Python scripting and text manipulation. If you are interested in any of the Python code I used in this data pipeline, I have it all available in my Github repository here. If you have any questions about the Python in this pipeline or how I transformed this data from one state to another, please leave a comment! I would be glad to help out.
Creating a Linear Regression Model with scikit-learn

Now that we have our data in a readable state we need to start planning for the next step in the evolution process and that is how to get our data from a readable state to a computational state. Our goal for this next step will be to perform some data mapping routines to replace all the string and floating point values in our readable state with values that fall within the same coordinate system. Our goal will be to take our readable data that looks like this:
[ { “city”: “value”, “artist”: “value”, “genre1”: “value”, “latitude”: “value”, “longitude”: “value”}]
And transform it into a computational state that looks like this:
[ { “city”: 1, “artist”: 2, “genre1”: 23, “latitude”: 44, “longitude”: 44}] // 1 -740
What this transformation will do is allow our initial data set to stay intact, but offload the strings and random floating point numbers from the latitude and longitude properties into one 5 indexical lists from 1 – 740. Each index in those lists containing a string or floating point value and now replaced with an index between 1 and 740. This provides data normalization for the computation that will take place in our next evolutionary step and that is to use scikit-learn to create a linear regression model.
First, before I get into to building out our linear regression model, I thought it would be useful to take a minute and describe what scikit-learn is. Scikit-learn is an excellent set of tools written and ported to Python for performing data analysis and machine learning. Almost every area of scientific computing utilizes scikit-learn is some way e.g., biology, astronomy, and meteorology to name a few. This is another great reason CoreML works with scikit-learn, there will be a lot of use-cases out there for bridging mobile development and scientific computing together now.
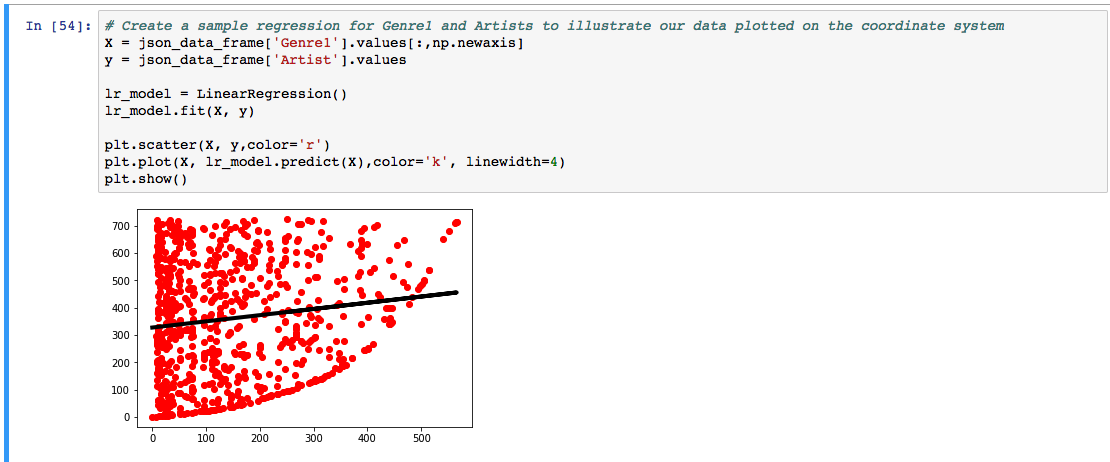
So, what is a linear regression model and why do I need to create one in scikit-learn to work with CoreML? Well, to answer the first part of that question, a linear regression model is a mathematical approach at modeling the relationship between data represented on a Cartesian coordinate system. So, for example, if I have a set of data, and I can plot a distribution line in a coordinate system that represents the relationship between that data, then essentially, I can make intelligent decisions about the similarity of that data. That then ultimately leads to our model calculating more precise decisions about musical recommendations we present to the user.. Below is a small sample of the data used for this article plotted out in a Jupyter notebook available on my Github.

In terms of why we need to work with scikit-learn to create a linear regression model? Well, my biased answer to that question is because scikit-learn is one of the best open sourced tools out there for modeling machine learning data. The other less-biased answer to that question is because Apple has created a very nice Python package for you called coremltools that let's you directly transform a model already built in scikit-learn to CoreML. That is a massive win in terms of productivity. Anyone that already has a model created in scikit-learn can transform it directly into a CoreML model with a very small amount of code.
Let's take a look at the next step in our process, and that is actually create our linear regression model in scikit-learn with our data that is in the computational state. This process is relatively straightforward as we utilize pandas to load the computational data from the JSON file and then fit that data to the scikit-learn linear regression object. And that is it! All of that data processing you had to do to get here and now there is only three lines of code to create the model for our recommendation engine!
from sklearn.linear_model import LinearRegression
import pandas as pd

# Create a pandas data frame and load the data that is in the computational state
json_data_frame = pd.read_json('final_artist.json')

# Use scikit-learn to create a linear regression object
model = LinearRegression()
# Fit the model for the all of the fields in our JSON object, using the artist as the target
model.fit(json_data_frame[["City", "Genre1", "Latitude", "Longitude"]], json_data_frame["Artist"])
Integrating our Model with CoreML
The last step in our evolutionary process is to take our linear regression model, integrate it with CoreML to generate a mlmodel file, and start testing out our model to make recommendations! To integrate your existing model with CoreML is really just an extension of the Python code I wrote in the previous example. Except now, the model is being converted to a CoreML model through the use of the PyPi package, coremltool. To create the Artist.mlmodel file, rework the code to look like the following Python code below:
from sklearn.linear_model import LinearRegression
import pandas as pd
import coremltools

# Create a pandas data frame
json_data_frame = pd.read_json('final_artist.json')


model = LinearRegression()
model.fit(json_data_frame[["City", "Genre1", "Latitude", "Longitude"]], json_data_frame["Artist"])

coreml_model = coremltools.converters.sklearn.convert(model, ["City", "Genre1", "Latitude", "Longitude"], "Artist")

# Set model metadata
coreml_model.author = 'Matthew Eaton'
coreml_model.license = 'BSD'
coreml_model.short_description = 'Predicts the next artist based upon random music data'

# Set feature descriptions manually
coreml_model.input_description['City'] = 'City where artist is from'
coreml_model.input_description['Genre1'] = 'The genre the artist falls into'
coreml_model.input_description['Latitude'] = 'Latitude of where this artist is from'
coreml_model.input_description['Longitude'] = 'Longitude of where this artist is from'

# Set the output descriptions
coreml_model.output_description['Artist'] = 'Predicted Artist'

# Save the model
coreml_model.save('Artist.mlmodel')
Now for the fun part. Let's test out our model to make a musical recommendation! Lucky for us, Apple developed a set of extensions in the coremltools package that will allow us to check the accuracy of our model before integrating it into an iOS or macOS application. This will take a lot of the work out of fitting and refitting the data we discover it is wrong once it is integrated into the application already.
To test an artist recommendation, look through your computational data for a sample JSON object to test. Once you have a sample object, load the city, genre1, latitude, and longitude properties into the model using the predict method to get a artist recommendation. Below I provided a sample recommendation of a southern rock band called, He Is Legend, from North Carolina. Which produces a southern blues/rock artist from North Carolina called Tarheel Slim! The recommendation engine was a success!
# Load the model
model =  coremltools.models.MLModel('Artist.mlmodel')

# Make predictions
// {'City': 160, 'Genre1': 78, 'Latitude': 141, 'Longitude': 141} <- Artist: He Is Legend
recommendation = model.predict({'City': 160, 'Genre1': 78, 'Latitude': 141, 'Longitude': 141})
recommendation  // Produces a recommendation for Artist: Tarheel Slim, success!
I hope you have enjoyed my research into the capabilities of CoreML and all of the possibilities it opens up for integrating machine learning into iOS and macOS applications. I will provide all of the data, sample code, and my mlmodel that I used for this article up on my Github page here. Thank you very much for reading and if you have a suggestion, please, leave a comment. I would love to hear from you!


